Table of Contents
ToggleIntroduction
Microbiology is the study of microscopic organisms such as bacteria, fungi, viruses, and protozoa. For students entering this fascinating field, hands-on laboratory experiments are crucial. They not only reinforce theoretical concepts but also develop practical skills such as microscopy, aseptic handling, and microbial identification.
This article explores the microbiology experiments for students, covering objectives, principles, procedures, and learning outcomes. Whether you are a beginner or an advanced student, these experiments provide the foundation for understanding microbial diversity, behavior, and applications.
1. Microscopic Observation of Bacteria
Objective:
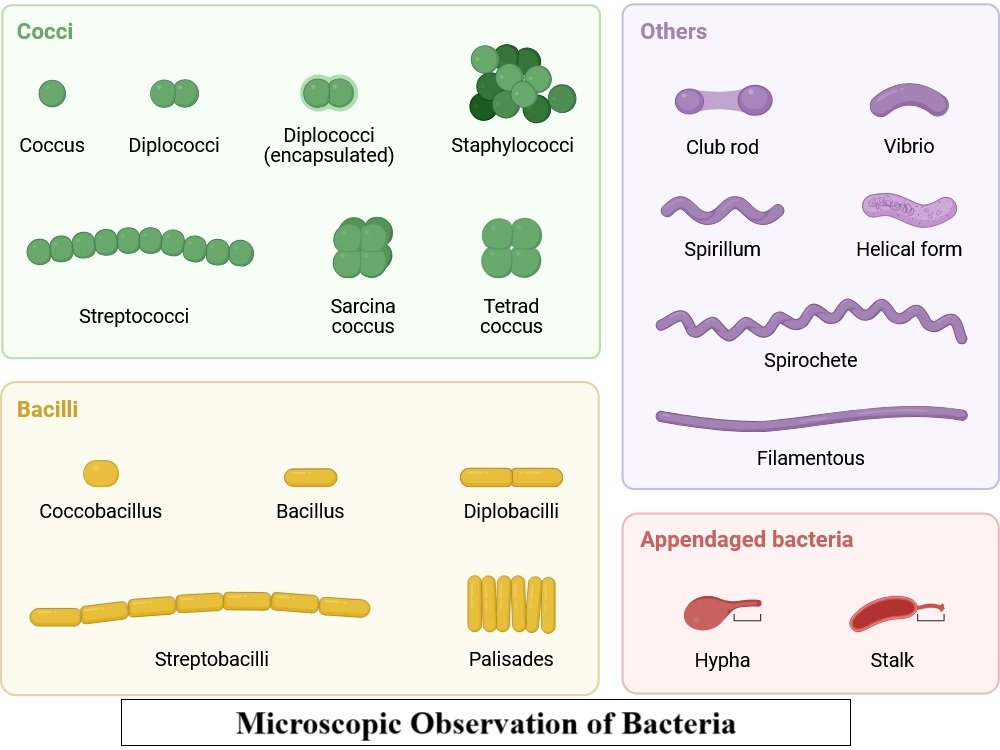
To observe bacterial morphology (shape and arrangement) using staining and microscopy.

Principle:
Bacteria are too small to be seen with the naked eye. Staining increases contrast, making structures like cocci, bacilli, and spirilla visible.
Procedure:
The process for preparing slides correctly, which is necessary for successful bacterial viewing, is outlined below:
- Clean a glass slide and cover slip.
- Prepare a thin smear of bacteria from soil, water, or yogurt.
- Heat-fix by passing the slide through a flame.
- Stain with methylene blue for 1 minute, then rinse and dry.
- Examine under oil immersion (100x objective).
Learning Outcome:
Students learn the basic shapes of bacteria and gain initial microscopy skills.
2. Environmental Monitoring (Settle Plate Method)
Objective:
To study airborne microorganisms using passive sedimentation.
Principle:
Microbes present in air settle by gravity onto nutrient agar plates and grow into colonies.
Procedure:
- Expose nutrient or Sabouraud agar plates in the environment for 30–60 minutes.
- Cover and incubate plates at 25–37 °C for 48–72 hours.
- Count colonies (CFU/plate/time) to estimate microbial load.
Learning Outcome:
In open environments, students learn how to monitor air quality and evaluate microbial load.
3. Gram Staining
Objective:
To differentiate bacteria into Gram-positive and Gram-negative groups based on the features of their cell walls.
Principle:
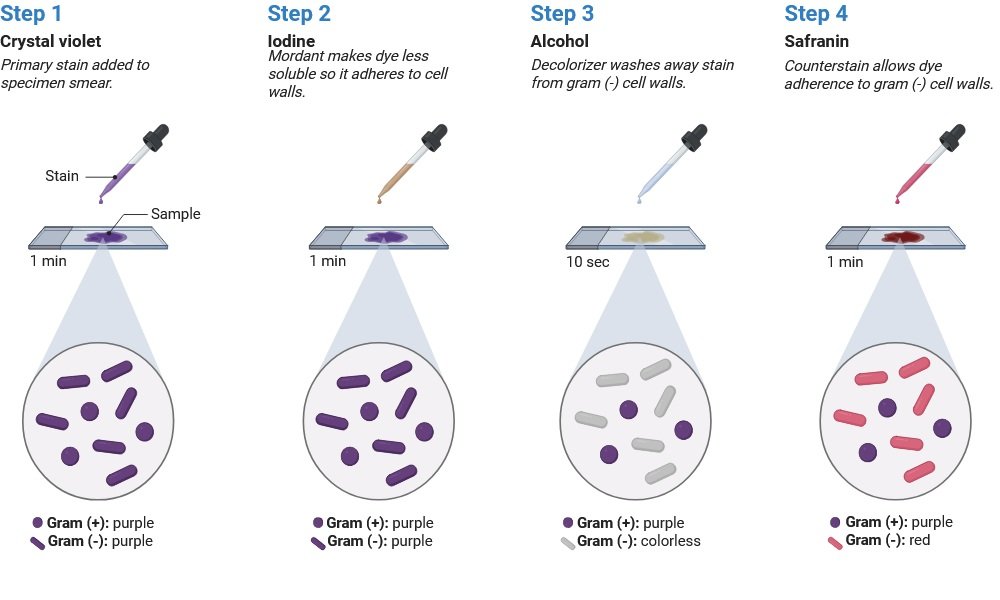
Gram-positive bacteria: Gram-positive bacteria appear purple because they have a thick peptidoglycan layer that holds the main stain (crystal violet–iodine complex).
Gram-negative bacteria: Gram-negative bacteria have an outer membrane and a thin peptidoglycan layer, which causes them to turn pink/red after decolourization because they absorb the counterstain (safranin) and lose the main stain.
Procedure:
Making a slide smear:
- A droplet of the suspended culture is put onto the microscope slide using an inoculation loop.
- A drop or a few loopful of water are added to a petri dish or a slant culture tube that contains the colony in order to promote an only a little bit of colony transfer to the microscope slide.
- You just need a little bit of culture. Excessive culture collecting is suggested by the fact that culture may be seen visually on the inoculation loop.
- With an inoculation loop, the culture is distributed to an even thin film that is 15 mm in diameter. If numerous cultures are being examined, a normal slide may hold up to four small smears.
- The slide may be dried either by air or by using a low flame to apply heat.
- To avoid overheating or ring patterns in the slide, it should be moved in a circular motion over the flame.
- By facilitating cell adhesion to the glass slide and minimizing culture loss during washing, the heat aids in the process.
Gram Staining:
- The fixed culture is treated with a crystal violet stain. The stain is poured out after 10 to 60 seconds, and the extra stain is rinsed with water. The aim is to remove the stain without removing the settled culture.
- For 10–60 seconds, the smear is coated with iodine solution. This procedure is known as dye fixing. The iodine solution is the slide is rinsed under running water after being poured off.
- Add a few drops of decolourizer to the slide. The mixtures of solvents in decolourizers are frequently ethanol and acetone. The procedure is referred to as solvent treatment. Water is used to rinse the slide for five seconds.
- The decolourizer should be added and discontinued as soon as possible to prevent too much decolorization in the gram-positive cells. The solvent is colourless as it runs across the slide.
- The smear is counter stained for 40 to 60 seconds with basic fuchsin solution. Excess water is blotted using the bibulous paper after the fuchsin solution is rinsed off with water. After removing extra water by shaking, it off, the slide can also be air dried.
- In a Microscope, look for oil immersion.

Learning Outcome:
Students acquire proficiency in diagnostic microbiology, learn staining methods, and learn about bacterial classification according to cell wall structure.
4. Media Preparation
Objectives:
To create culture media that facilitates the cultivation, separation, and investigation of microorganisms under lab settings.
Principle:
Essential nutrients (carbon, nitrogen, minerals, and growth factors) necessary for the survival and proliferation of microbes are provided by culture media. The kind of media (nutritive, selective, differential, or enrichment) dictates which organisms can grow and how they may be recognized. The medium is rendered free of contamination prior to inoculation by sterilization.
Procedure:
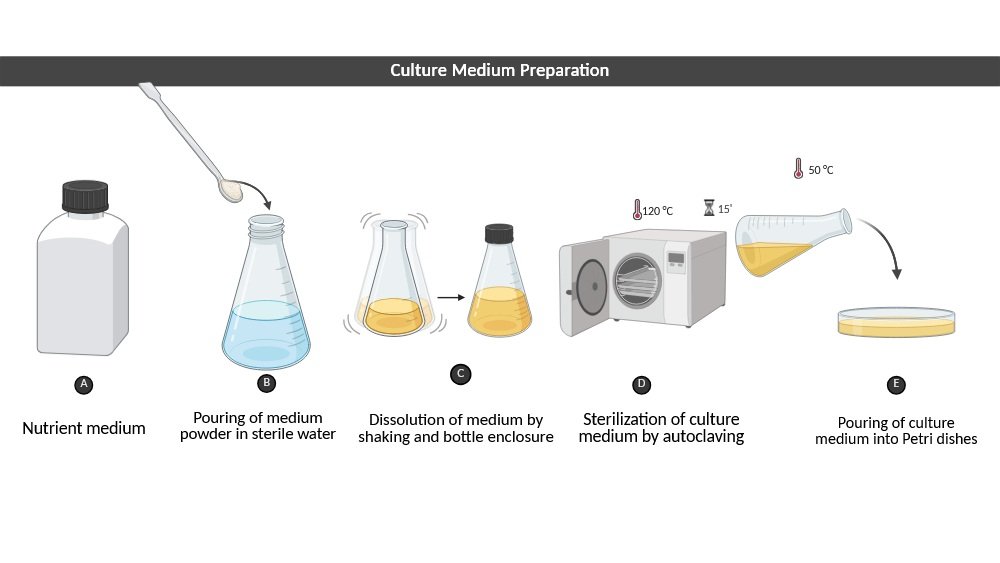
The appropriate amount of dehydrated media should be weighed and dissolved in distilled water, the pH should be adjusted as necessary, the mixture should be put into containers, and the mixture should be sterilized by autoclaving at 121 °C. Let it cool for 15–20 minutes before introducing it to plates or performing inoculation.

Learning Outcome:
Students learn how to produce sterile and nutritionally sound media for microbial culture, comprehend the functions of various media kinds, and acquire aseptic handling techniques.
5. Water Testing
Objectives:
To identify and measure microbial pollution in water samples in order to determine their safety and quality for use in laboratories, industry, or as drinking water.
Principle:
Culturing methods can be used to identify the presence of microorganisms in water. Fecal contamination is evaluated using indicator organisms like coliforms. The most typical techniques are direct plating on selective media, membrane filtration, and the Most Probable Number (MPN). The number of colonies and their growth are used to estimate the microbial load (CFU/mL or CFU/100 mL).
Procedure (Membrane Filtration):
- Collect water aseptically.
- Pass a known volume through a 0.45 µm membrane filter.
- Place the filter on selective agar (e.g., Endo agar).
- Incubate at 35–37 °C for 24–48 hours.
- Count colonies and calculate CFU/100 mL.
Learning Outcome:
Students develop the ability to identify indicator organisms, comprehend the significance of microbiological water testing, and acquire the skills necessary to evaluate water safety in the fields of environmental, industrial, and public health microbiology.
6. Culture Techniques
Objectives:
To quantify the number of microorganisms in a sample using colony-forming units (CFU) and to separate out pure colonies from varied microbial populations.
Principle:
Individual cells become spatially separated on solid media when microbial samples are diluted physically (streaking) or numerically (serial dilutions). Every viable cell develops into a unique colony. According to this concept, colonies can be separated for pure culture, and the number of colonies can be used to determine the number of live cells in the original sample.
Procedure:
The Streak Plate Method:
A sterile loop is used to select the inoculum, which is then sequentially spread across four quadrants of an agar plate. Streaking’s dilution effect progressively lowers cell density, ultimately producing isolated colonies in the last quadrant.
The Spread Plate Method:
A little amount of diluted microbial suspension (typically 0. 1 mL) is pipetted onto the surface of a solidified agar plate and uniformly distributed using a sterile glass spreader (hockey stick). Discrete colonies form on the agar surface after incubation, facilitating viable count measurement.
The Pour Plate Method:
A specified volume (usually 1 mL) of diluted sample is put into an empty, sterile Petri dish. The inoculum is gently mixed into molten agar (cooled to approximately 45 °C) before being allowed to harden. Following incubation, colonies develop on the surface and inside the agar medium, allowing for quantitative microbial counts.
Learning Outcome:
Students gain proficiency in carrying out viable counts and isolating pure cultures. They learn how colony formation is related to the development of a single microbial cell, how to choose colonies for sub culturing, and how to determine CFU/mL or CFU/g. These methods are essential for ensuring the quality of pharmaceuticals, food, and water, as well as for clinical diagnostics and microbiological study.
7. Aseptic Technique
Objectives:
To prevent contamination during microbial handling.
Principle:
Reducing exposure, working close to a sterile environment, and flaming lowers the risk of contamination.
Procedure:
- Sterilize inoculating loop before and after use.
- Minimize opening of culture tubes/plates.
- Perform transfers close to a Bunsen flame.
Learning Outcome:
The course gives students vital lab experience in performing microbiological tasks in a safe and trustworthy manner.
8. Bacterial Growth Curve
Objectives:
In order to examine the stages of bacterial growth in liquid culture.
Principle:
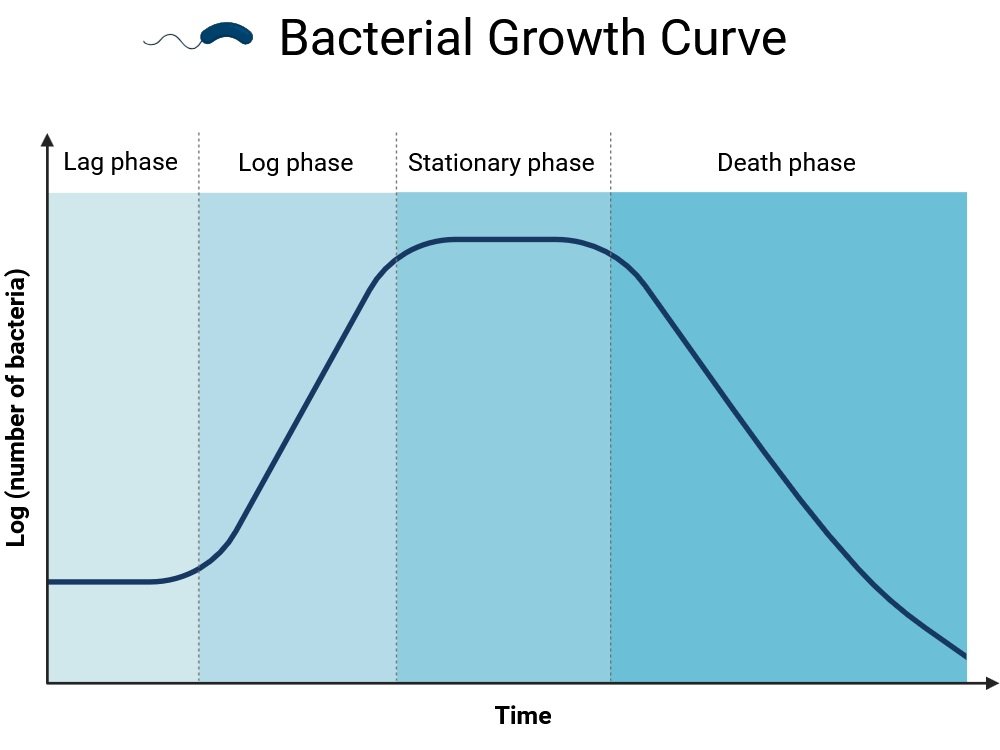
Growth follows four phases: lag, log, stationary, and death. Optical density (OD) readings track these changes.
Procedure:
- The bacteria (Staphylococcus aureus) were cultured in 15 ml of nutrient broth and incubated overnight in isolation.
- The OD of this culture was measured and confirmed the next day.
- The following dilution formula was employed to bring the inoculum’s OD to the conventional value of 0.05:
- OD1V1 = OD2V2
Where,
- OD1 = The broth culture’s OD, which had been inoculated the day prior.
- V1 = the quantity of this broth culture that will be added to the inoculums.
- The inoculum’s OD2 is the OD value (as a standard, this value was set to 0.05).
- The volume of the inoculum (50 mL in this experiment).
- The values were substituted into the equation, and V1 was determined.
- Before adding an equal amount of the broth to it, the aforementioned quantity (V1) of the inoculum was pipetted out to maintain the net volume constant.
- Every half hour, the OD was monitored and documented.
- A standardized growth curve of the organism was created using this OD value (Absorbance vs. time).
- The generation time was determined.

Learning Outcome:
Students learn about the kinetics of microbial growth and population dynamics.
9. Aseptic Methods
Objectives:
To manage microbial cultures without infecting them.
Principle:
Minimizing exposure, working close to a sterile environment, and using fire all help to reduce the risk of contamination.
Procedure:
- Before and after each usage, sterilize the inoculating loop.
- Work as close to the flame as possible while only opening tubes/plates slightly.
- Transfer inoculum to media aseptically.
Learning outcome:
Students learn the critical laboratory skills necessary for performing microbiological research safely and reliably.
10. Human Cheek Cell
Objective:
To use a microscope to examine the structure and shape of human cheek epithelial cells.
Principle:
The epithelial cells of the human cheek are eukaryotic. They lack a cell wall but have a unique nucleus and cytoplasm. Because they are transparent, staining them with methylene blue or safranin enhances contrast, allowing cellular structures to be seen under a microscope.
Procedure:
- Place a drop of saline on a clean slide.
- Swab inner cheek and smear sample onto slide.
- Stain with methylene blue, add cover slip.
- Observe under microscope (start with 10x).
Learning Outcome:
Students compare prokaryotic and eukaryotic cells, reinforcing cell biology concepts.
Conclusion
Microbiology experiments are not only essential for building laboratory skills but also for appreciating the unseen microbial world. From observing bacterial shapes to measuring growth curves, each experiment deepens students’ understanding of microorganisms and their roles in health, environment, and industry.
By mastering these 10 classic experiments, students prepare themselves for advanced studies, research, and real-world applications in microbiology.
Frequently Asked Questions (FAQs)
Q1: Why is Gram staining important in microbiology?
Gram staining helps classify bacteria based on cell wall structure, which is essential for diagnosis and antibiotic selection.
Q2: What are the basic shapes of bacteria?
The main bacterial shapes are cocci (spherical), bacilli (rod-shaped), and spirilla (spiral).
Q3: What is the purpose of aseptic technique?
Aseptic technique prevents contamination of microbial cultures and protects the researcher from pathogens.
Q4: Why are coliforms used in water testing?
Coliforms indicate fecal contamination and potential presence of pathogens.
Q5: Which experiment is best for beginners?
Microscopic observation of bacteria is the simplest and most fundamental experiment for new students.
Also Read
- Agriculture Microbiology Research Topics: Innovations Driving Sustainable Farming
- Food Microbiology Research Topics: Emerging Trends and Future Perspectives
- Parasitology: An Overview of Parasites, Diseases, and Host Interactions
- Antibiotics: Introduction, History, Mechanism and Applications
- Culture Staining Techniques in Microbiology: Types, Methods, and Applications
- Best Microbiology Universities
- Latest Research Topics In Microbiology
- Food & Industrial Microbiology notes
- Molecular Blotting: Techniques, Uses, and Significance
- Spirulina: The Superfood Microalga with Limitless Potential
- Microbiology: From Microorganisms to Career Opportunities
- Basic Microbiology Quiz
- Medical Microbiology Quiz
- Microbiology Notes
- Bacteriology Notes
- Immunology Notes

